Monday, April 29, 2013

Pond Themed Playdough

 Emma's class has just started a pond study (I know, pretty cool, right?)  To go along with this fun theme I made some pond inspired playdough for her to explore with after school today. She was thrilled and had so much fun building little ponds and showing me all the things she has been learning.
 What does pond playdough smell like you wonder? That was my dilemma at first and then...of course! Tea tree oil! Perfect to give the dough an earthy sort of smell. Tea tree oil is also anti-viral and a natural lice repellent...oh yea, tea tree dough is looking good for a kindergarten classroom!
Recipe for Pond Playdough
2 cups + 1/4 cup flour
1/2 cup salt
2 tbs cream of tartar
3 tbs oil
4 drops of tea tree oil
1 cup boiling water
liquid watercolors

1. Add 2 cups flour, salt, cream of tartar, tea tree oil and oil to a large bowl.
2. Add the boiling water and quickly mix everything together. The dough will be sticky and seem too wet at this point.
3. Dump the dough to a flat surface and slowly add a little bit of the remainder flour at a time while kneading. Once the dough is a nice soft texture and no longer sticky stop adding flour.
4. Divide dough into 3 balls and knead watercolors into each ball. We did brown, green and blue to keep with our pond theme.

Saturday, April 27, 2013

Flowers, flowers and more flowers!

Yesterday the kids and I spent the day at the Tulip Festival. It was breathtakingly beautiful. It's one of those places you wish you could take everyone you know because a picture can never do such beauty justice. It was a wonderful day, even at the moment Grayson completely lost it over Emma asking if he needed help picking the one and only yellow tulip that he wanted to bring home. Yep, he threw himself down in the middle of the yellow and orange tulip rows and screamed and kicked and screamed some more, but I gotta say a two-year old melt down is much more tolerable when spent in the middle of this. 
He recuperated pretty well and decided on a purple tulip to take home. Good choice, Grayson! They were my favorite. With his new favorite tulip in hand and a ride on the cow train we were back to blissful peace out at the Tulip Festival. 
With flowers on the mind I thought I would share some wonderful flower crafts we have been enjoying this spring.
 Starting with Egg Carton Tulips seems appropriate! Isn't it amazing what you can do with an egg carton. They must be one of our most used recycled art good. I can never bare to toss them into the recycling bin.
 With a pipe cleaner stem and a button center these sweet flowers came together pretty nicely.
We used watercolor to add some color, but tempura paints would probably give you a better "pop" of color on your tulips. 
 Speaking of egg carton awesomeness, check out our Egg Carton Spring Wreath!
We started out with a cardboard ring and added egg carton flowers all around it. I just love the way it came out.
 Last summer when I brought home these beautiful white hydrangeas from the store Emma asked if the flower fairies had missed this batch when out adding color to flowers everywhere. I told her they must have and this sparked a new craft in our house and a very important job for her.
Eager to help the fairies out Emma painted each petal of our white hydrangeas with watercolors. Painted Hydrangeas is a new favorite in our house.
 Paper Towel Flowers are pretty fun to make by painting with watercolors right on a paper towel. The colors spread and blend to make a really beautiful creation.
With a clothespin these colorful towels become a sweet little flower perfect for adding on top of a gift.
 More hydrangeas! These Coffee Filter Hydrangeas are so beautiful and easy to make.
OK, a pattern is happening here. I guess when flower crafting we tend to pull the watercolors out. Interesting. A pipe cleaner stem was added to these to make a sweet little bouquet.
 We started our Newspaper Flowers out by painting sheets of newspaper with colored glue. When the sheets dried they were easy to cut into petals and put together to create these fun flowers.
I love that you can still read them! Very cool looking flower.
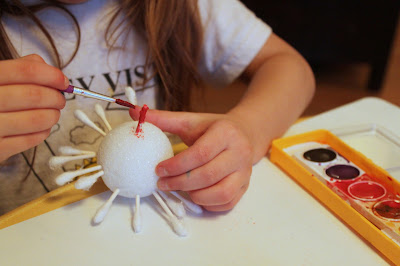
 This was an Emma idea inspired by her love of creating with q-tips. What I loved about it is that it became a really great fine motor skills activity for Grayson and they could enjoy this one together.
For these Q-tip Flowers I helped by cutting the q-tips in half and they stuck them into different sized styro balls. With a little paint (yes, watercolors!) and a pipe cleaner they became flowers. Very unique flowers, if I do say so.
 Magical Dandelions sprouted up in our yard recently and what a pleasant surprise they were! You can't go wrong with wishes and glitter!


Wednesday, April 24, 2013

Rose Print Napkins--for Mother's Day

 As summer is approaching I will be slowing down on my little happy place I like to call Green Owl Art. We will still be creating art and memories and I will try and share as much as I can, but sometimes you need to just un-plug!
With that said I am beginning the first Mother's day homemade gift today. I have quite a few to share, maybe I will do one big post if I don't get a chance to share them all.
 We made these super simple and super sweet, rose print cloth napkins with...celery! Very cool through the eyes of a five and two-year-old. They also snacked on (you guessed it) celery, while we created. Healthy snack and fun art...yippee!!
 We used fabric paint to stamp right on some basic cloth napkins. So easy!
A few additions with some green puffy paint and we had a pretty great gift...for me! Yes, she gave them to her dear mama, what a sweetie! Maybe we will make a few more for the dear Grandma's in our life, too.
I shared this over at Kiwi Crate, you check out more details there.

Friday, April 19, 2013

12 Recycled Crafts for Kids

Earth Day is April 22! Perfect time to spend the weekend creating with recycled goods. Several years ago Emma and I created a box to add to our recycling center. We call it the ART BOX and use it to recycle anything we may want to use for art one day. This has been a wonderful addition to our home. It gets the kids thinking in creative ways and always looking at trash as treasure!
I made this Stamp Set for Emma last year. She loved stamping her name and I loved how easy it was to make with some wine corks and foam stickers.
Got shoulder pads? Here is a much better use for them. You can make a fun Jelly Fish or any creature your little one can dream up.
I have to say....Emma and I had a little too much fun with these adorable empty mint tins turned Tin Box Monsters! They are great for holding the kids found treasures now.
Yes, I purposely made a bell with my children. This Homemade Bell is a recycled yogurt container and has been a kick start to several fun games of imaginative play. It is surprising what a child can dream up with just a bell.
While you're saving those yogurt containers, here's another one, these Recycled Party Hats are made from various recycled goods including small yogurt cups and berry baskets.
We made some fun Bottle Top Magnets by just adding paint and googly eyes to a bottle top. It's fun to see them dry and transform into silly little creatures.
Got five minutes? Then you can make a super cute no-sew DIY Apron from an old pillowcase!
Emma thought of this one on her own! I loved the idea and she loved pretending to be working hard at her Egg Carton Computer!
These very cool and stylish bracelets were made from a plastic water bottle! Make your own Water Bottle Bracelet with just a few simple materials.
Who needs to buy pretend food? Just dig through those recycling bins! My kids always prefer the real stuff over the toys, so to make these packages kid durable I cover them in clear heavy duty packing tape. Check out my Pretend Play post for more details.
Are these cute or what? Oh the things you can do with a paper roll. The mini pom-poms on our Paper Roll Octopus were definitely the perfect finishing touch.

Hope you enjoyed a few of our favorite recycled crafts. It is a wonderful thing to give new life to something that would have just been tossed out. I love that my children can look at an old milk carton and see so much more. 
Happy Earth Day! 


Wednesday, April 17, 2013

Earth Day Snack

I surprised the kids with this simple and healthy Earth Day snack this afternoon. I placed it at the table for them and Emma looked for a minute. I didn't say anything and let her figure it out. She did! Happily she screamed "love earth!"
Happy Earth Day!

Monday, April 15, 2013

DIY Dishwasher Detergent Pods

 I know this is not the typical children's craft you see on my blog, but I started making these dishwasher detergent pods and Emma was all over it and wanted to be apart of each step. So, I thought, well, why not? This is a great opportunity to teach her about being resourceful and sustainable.
 To get the full instructions, join me at Family Sponge today. It's basic and simple and apparently kids love to make dishwasher detergent!
 Our new sensory play. It was like a new form of playdough.
Wouldn't these jars make great Mother's Day gifts? I just used chalkboard paint on a mason jar and stamped my letters on with white ink. Some twine around the top and you would have a pretty unique gift that smells wonderful.

Sunday, April 14, 2013

DIY Crazy Hair Wig

 It all started two Christmas's ago when my niece opened up a gift and inside it was the most beautiful Rapunzel wig. I felt like I was moving in slow motion as I saw her pull the hair out and place it on her head. I jumped up from my seat in hopes to distract Emma, but it was just too late. She was staring right at my adorable niece with golden hair down to her toes. And...ever since then I have not heard the end of it. Yes, I could have just got her a darn Rapunzel wig at some point, I suppose, but kids plastic fake wigs that tangle constantly and smell kind of funny--drive me nuts! So I made this adorable yarn wig instead and called it magical hair!
 We started with a pipe cleaner tiara and a whole lot of yarn scraps.
 I tied and tied and tied........
 And WALLA! A magical hair wig. She loved it and played with it forever pretending to be all sorts of characters. It was wonderful.
And then she asked for a Rapunzel wig for her birthday.

For more details I shared this project over at Kiwi Crate.

Wednesday, April 10, 2013

Earth Day Crafts

 Earth day is April 22 and the perfect time to talk with kids about caring for our earth. Using recycled items to make a few fun earth themed crafts is a great way start.  This one started out with a large yogurt lid and some leftover dried rice.
 Colored rice is a great addition to your art supplies and easy to make. Check out my full instructions here, Mosaic Earth Lid.
 A few months back a friend of mine shared a wonderful video with me about making hot rocks. Of course, I can't seem to find it now to share with you, but it was a beautiful tutorial that started with children collecting stones by the beach. They brought them home and warmed them in the oven to then use crayons on them to create beautiful colored stones.
 When the rocks are warm the crayons melt as you color them. This is one of our new favorite crafts to do. We decided using green and blue crayons would make the perfect earth rock. Check out more here, Earth Rock.
 Glass paints are a wonderful way to dress up old jars and votive holders for any occasion. I love how our earth glows!
 This will be lighting our table come Earth Day. Here are the details to making your own, Earth Luminary.
 Got a lot of paper scraps? We do! We turned them into an Earth Collage! Paper punches are a lot of fun for kids and gives them crafting confidence!
 Checkout out our Earth Collage and see how simple and fun this can be for young kids to do.
 This is one of my favorites from last year. Recycled Earth Day necklace!
Daddy helped out with a little bit of drilling, but Emma did the rest and wore her necklace very proudly for Earth Day.

Happy Earth Day!
xo
green owl mama