Showing posts with label painting. Show all posts

Tuesday, March 17, 2015

St Patrick's Day Painting Fun


 Remember that paper roll heart stamp I shared for Valentine's Day? Well, stamp it three times to make a simple little shamrock and a wine cork makes a great stamping tool too! Yes, you must sacrifice and finish that bottle on wine for the sake of your children's St. Patrick's day art fun. Someone has to do it, right?
And lastly, Grayson and my sweetie nephew Nicholas enjoyed stamping with some shamrock cookie cutters. I put an assortment out the next day and Emma made a entire cookie cutter scape. She had fun filling the images in after with markers. This is an easy set-up activity, great for lazy weekend mornings. I have shared this over at Kiwi Crate, join me there.
Can you believe just four more days until we are mid March! This year is flying by.
Happy St Patrick's Day!

Friday, February 13, 2015

Kool-Aid Paint

 My kids think kool-aid is an art supply and that is all. I think it's pretty fantastic, but I am sure someone will burst my bubble soon and fill them in on the joys of drinking pure sugar, but in the meantime we continue to make kool-aid play dough and kool-aid paint with our very common "art supply."

 This is so easy to set-up. All you need is those little colorful packets and water. I usually use an entire packet to about 1/4 cup of water or so. Warm water helps dissolve the kool-aid a little faster.

 That green one was actually a frosting add-in (yum!)

 Em loves to help make these paints and she loves that her paintings smell so good! When we were using these paints the other day we thought this would make the perfect yummy smelling Valentines for friends. I'm thinking red kool-aid painted hearts on card stock. What do you think? It's almost a treat!

 Happy Valentine crafting!

I shared this over at Kiwi Crate. Head over for more Valentine's Day fun!


Wednesday, February 4, 2015

Celery Rose Prints

 When I was brainstorming for something to use to make prints with for Valentine's Day, celery was an obvious choice. If you do not know yet, (now you do!) celery makes the most beautiful rose prints.

 You just use the bottom part of a celery bunch, the part you would toss into the compost, so no wasted food here. We have always made red roses, but decided to get a little crazy and throw in some purple to the mix on this day. I know, I know....we are a bit of a dare devil type family. Never know what's going to happen in this house (look out, pink snowman coming your way!) Tehe...it's early...I need coffee.

  We paired our prints with oil pastels and they came out so vibrant and fun. If you have not tried oil pastels with the kids yet, I highly suggest you give it a go, but of course crayons would work just fine, too.

Now that I am looking at these photos I think going over this with watercolors would be fantastic! I wonder what other produce would give you a floral print. I see a spring bouquet print in my future!

Monday, March 31, 2014

Georgia O'keefe Inspired Art Lesson

 With all the beautiful blooming flowers around us I thought it would be the perfect time to teach the kids a little about an artist I just adore, Georgia O'Keeffe, most famous for her beautiful paintings of large and very detailed flowers.

 We picked up a few books from our local library on O'Keeffe. The kids loved flipping through the pages and looking at all of her infamous artwork. Em enjoyed seeing actual photos of O'Keeffe and hearing all about her life.

 After we browsed the books I talk to Em and G about her painting style and showed them a few examples. I gave them each a real flower and a magnifying glass to observe all the details they could find in each flower. They noticed a lot more then I had expected!

 I gave the kids a black oil pastel to start their drawings. I was sure to point out to them that O'Keeffe's flowers often extended off of her painting and allowed us to use our imaginations to see the rest of the flower.
After they finished their drawings they chose just a couple colors on tempera paint to complete their flower. I encouraged them to paint the background as well as the flower.

 Em and G both enjoyed this so much. They were very intrigued and excited to learn about the artist and I just love that. I see an artist series in our future.

A few books we enjoyed during this lesson:

My Name Is Georgia: A Portrait by Jeanette Winter

Through Georgia's Eyes: by Rachel Victoria Rodriguez

Wideness and Wonder: The Life and Art of Georgia O'Keeffe


Thursday, January 23, 2014

Marble Paintings

 Marble painting is one of our favorite painting techniques, probably because you can make art and get silly all at the same time! Bonus--the paint is all contained in one box!

 Supplies:
card stock or any heavy paper
marbles
paint
a box (about double the size of your paper

 1. Place your paper in the box (side flaps removed) and add a few drops of paint on the side of the paper.
 2. Drop the marbles into the paint.

 3. Now have the kids roll the marbles back and fourth around the box. This is the silly part that the kids love.

 4. Once the paper looks nice and colorful, remove, let dry and start over!

 These prints come out really fun and the kids love to make them. I was thinking we could just cut hearts out of our art for some really fun Valentines. You could also start with heart cut-outs that you place in the box.
I am going to be doing this at our school craft day this year. I think it will be a hit with several age groups. I was thinking of using newspaper hearts (wouldn't that be pretty cool?!)

I shared this over at Kiwi Crate.Check it out!


Friday, December 6, 2013

Watercolor and Salt Winter Scene

 Our first snow arrived today. Nothing like it. We were in a happy winter mood and decided it was the perfect afternoon for some winter scene paintings.
 I am a big fan of watercolors for my children and myself. There are so many different ways to use and adapt them to every age. There is not much I would rather be doing then sitting with my kids and creating a watercolor painting together. It just makes me happy!

 For this winter scene project we used a pan set, but we are big fans of liquid watercolors as well. They are easy for little ones to use and you can also use it for things like shaving cream prints and to color play dough! Talk about versatile.

 To start our project I had the kids create some bare winter birch trees with masking tape on a sheet of watercolor paper (yes, this paper makes a big difference when working with watercolors.)
This project has been done in so many different ways and I wish I could find my first inspiration for it, but we've been painting these for several years now and it never gets old.

 Once the masking tape trees were in place the kids started to paint the background winter sky. I asked them to use only three colors for this project and focus on blending the colors.

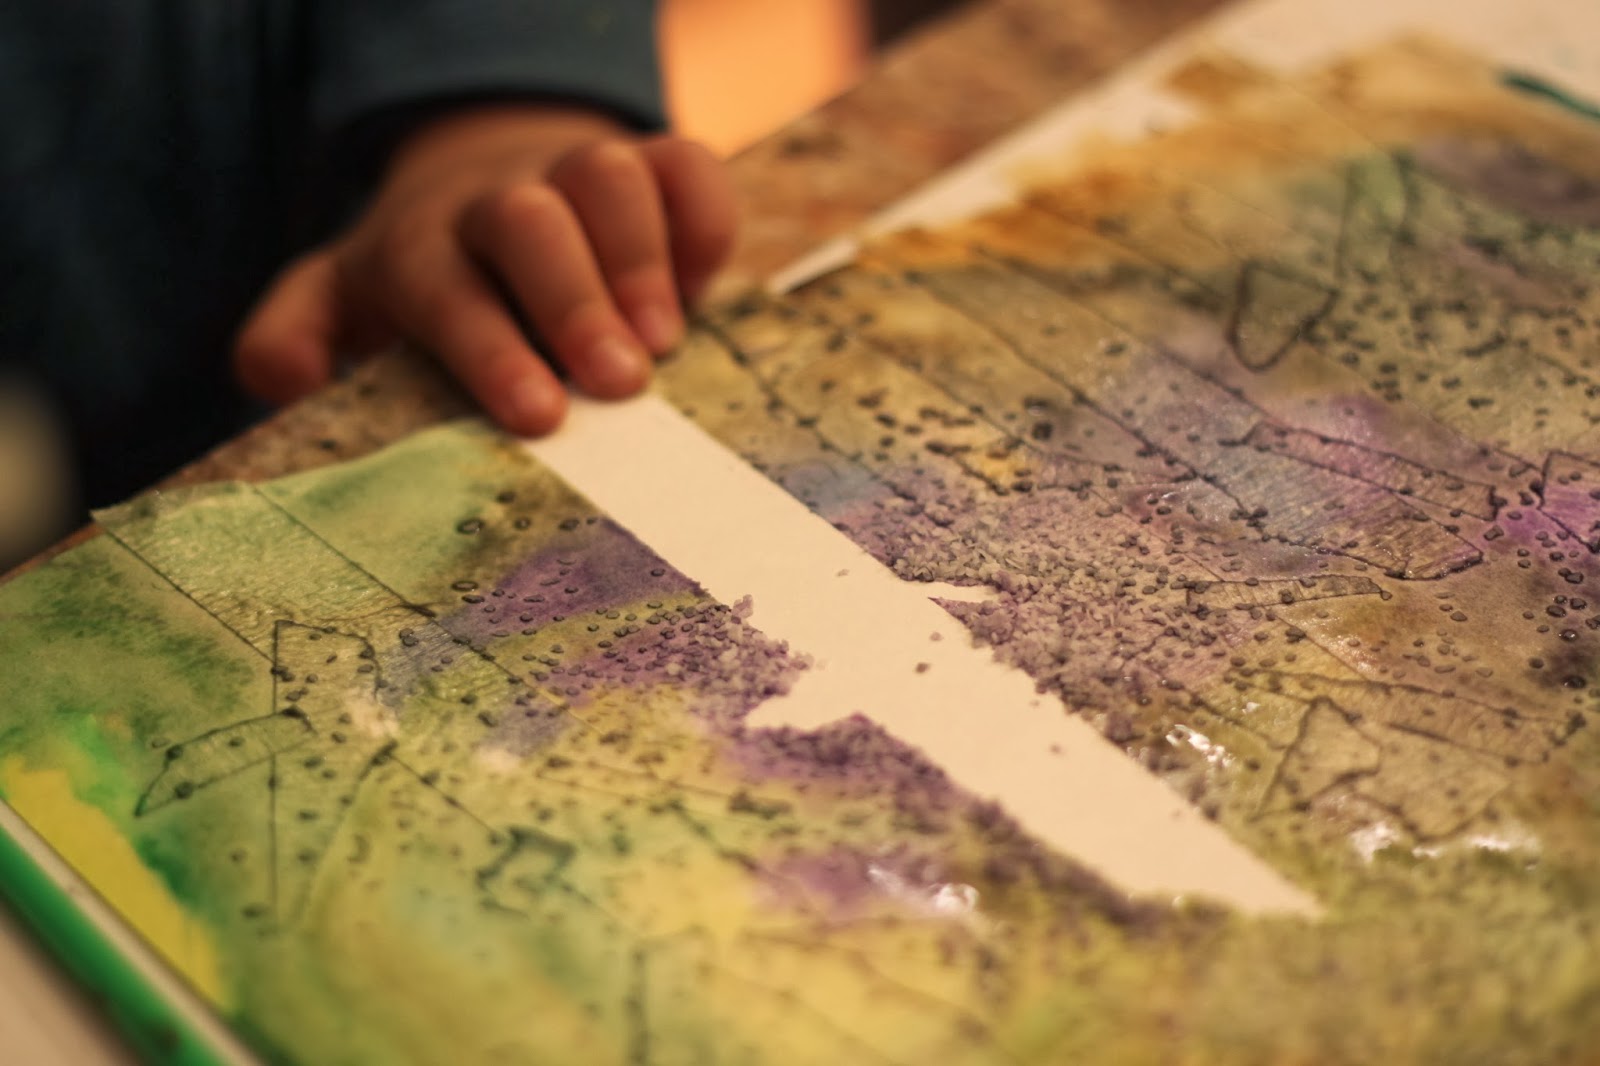
 We compromised and they used about five colors. They painted right on top of the tape (so be sure the tape is sealed to the paper well.)

 While the painting was still wet we sprinkled a little bit of sea salt on top. This is to create a snowy look. The salt absorbs the watercolor and looks like snowflakes falling. It's instantly beautiful.

 G got a little carried away with the salt. I was just happy how engaged he was in this. I usually lose the little one after step two.

 Finally the tape comes off to reveal our beautiful birch trees. I think I forgot to mention to encourage tearing of the tape to create rough edges. It makes a big difference.

Using a dry brush we added lines to the trees and let our painting dry. Once dry most of the salt falls off and leaves behind our wonderful snowflakes.
What a great way to spend our first snow day. Happy winter, friends!

Sunday, June 23, 2013

Creating Wall Art with Children

 There are many paintings around my home that my children and I have created together. They are so special to me and I am sure one day they will be very special to my children, as well. I get asked about these so often. How to get your children involved in such a painting? How to keep it from turning into one big brown canvas?? I decided to right a post with tips to create your own masterpiece as a family. It's actually a great hobby to do together.
 OIL PASTEL, CANVAS & IDEA
I usually have my kids start with a large canvas and a black oil pastel. We sit and talk about what we want to paint and then talk some more about the different details that should be in our painting. At this age it is much easier for them to draw on the canvas and fill in with paint. Starting with paint is better for a very abstract painting.
TAKING TURNS ADDING TO THE ART
Having the kids take turns adding details has become a wonderful tool I use. Not only is it keeping our initial drawing from becoming too over crowded and out of control, but it is teaching my kids to work together and to be patient. At first, there was a lot of bickering, but eventually they enjoyed taking a moment to appreciate what the other was drawing. It was nice, really nice.
PAINT
Once we were satisfied with the drawing we moved on to paint. We used acrylic paints and kept it very simple using just four colors. Before I unleashed the paints I asked the kids to try their best to keep one brush to one color and to try not to mix colors too much. I also showed them how to blend instead of mix (this is very helpful at keeping a painting from turning into the infamous "brown" painting.)
 At this point we all painted together. The taking turns for the drawing stage was great, but all that is thrown out the window once the paint comes out!
 
 Here is what we ended with. Pretty good, right?
FINAL TOUCES
Once the painting was dry I used a foam brush and added a little bit of white washed details to soften it up a bit. You do this by dotting white paint in the areas you wish and using a rag to almost rub it in. This creates a softer look. I also used some gold paint to outline some of the kids drawings that I really wanted to stand out.
 We all signed out masterpiece and I gave our art two coats of clear varnish.
That was it. A beautiful painting made by my babies (and me.) Is it too presumptuous to imagine this hanging in my future grandchild's nursery???

Friday, June 14, 2013

Rubber Band Splatter Painting

 Summer vacation is officially here and that means it's time to dig up all those backyard messy fun activities. DIY Splatter Art is one we did last summer and my kids have not stopped talking about it since.
 All you need is an old frame (glass and inserts removed,) large rubber bands, paint, paint brushes and card stock.
 This long frame worked great for the two kids to each have their own space because there was no way that "taking turns" was going to go over well with something this exciting!
 Once the rubber bands are wrapped around the frame I place the card stock in between them and got our paint ready. I told the kids to only paint the rubber bands. They were a little skeptical, but not for long......
 The delight on their faces when I made the first splatter was wonderful! They were simply happy. Doesn't take much and I love that!
 This is a pretty messy activity. I definitely suggest using washable paint as my kids got a little splattered themselves! Emma loved her new added colors.
 Look how cool the cards were looking. Did I say we were making fun birthday cards? We love homemade cards.
I'll be breaking out this old frame turned splatter paint station this week. Happy Summer!!