Monday, April 30, 2012

Stained Glass Art Suncatcher

I have to admit, I have a little bit of a sun catcher addiction. They look so beautiful as the sun hits each color and when they are made by the people I love that makes them even more of a reason to love.

Materials Needed
black fabric (puffy) paint
contact paper
assorted glitter glues and/or *colored glues

I started this project out myself. I always love when I get to have some artistic fun with these projects as well. This step could easily been done by an older child as well.

1. Cut your contact paper about the size you want your sun catcher to be. Peel off the sticker side and lay onto a surface where it can be removed easily like a kitchen table or counter. Then get to work on your masterpiece using the fabric paint. I did a stained glass mosaic style house.
This needs to dry over night.

 2. When completely dry your child can start filling in the spaces with glitter glue and colored glue. Once all the holes are filled in, this again needs to dry overnight.


3. When it is completely dry you can peel the contact paper up and cut around your art. This will stick right to the window and look beautifully as it catches the sun.

I think this would make a wonderful Mother's Day gift.

*To make colored glue just add a few drops of food coloring or paint to a bottle of Elmer's glue. Stir with a chopstick or skewer and give a good shake.


Sunday, April 29, 2012

Simple Art - Aluminum Foil and Paint


 Here is some simple art for this beautiful Sunday morning. By adding a little dish soap to liquid water colors (probably any paint would work well) it creates a sticky paint that is perfect for aluminum foil to be the canvas. My children love to paint in new ways with different materials. The paint on the foil looks shiny and pretty. I think I will add some glitter to the mix for some extra sparkle next time. Enjoy and Happy Sunday!
xo


Wednesday, April 25, 2012

Bird Nest Helper


Teaching children to love and respect all living things will result in more compassionate men and women.
I believe this with all my heart. As a child, my mom would allow us to bring home any stray animal we came across. She helped me to bottle-feed ten tiny rat babies when my pet rat Samantha unexpectedly became a mother. She has taught me responsibility and love for each living creature that came our way.
I hope to pass this on to my children. I hope that they will stop for a lost dog, adopt a stray kitten or cry like I do every time that Sarah McLachlan animal cruelty commercial comes on. Being taught this kind of love as a child not only made me the person I am today, but extends to the kind of mother I have become.
You do not need to have a house full of orphan dogs to get this point across.
Something I like to do with each season changing is an offering for animals around us. Last winter, we left nuts and seeds out for the squirrels to collect. The year before we made a warm bed on our porch for a neighborhood cat. This spring, we made a nest helper to help the birds collect for their homes and to also encourage nests to be built close to our home. This way we will also benefit from being able to watch these beautiful birds in action.

Check out the rest of my article and tips to make a bird nest helper over at Family Sponge

Tuesday, April 24, 2012

Artterro Art Journal Kit review

 My wonderful and creative friends over at Artterro introduced me to their beautiful Art Journal Kits. I just love this company. They make open ended high quality children's art products and that is hard to come by.
Although I think this journal would be such a great tool for Emma to use as a creative board, I decided to try out the journal for myself. My desk is usually covered in little post-it notes and scrap pieces of paper with ideas that have come to me while out and about. A journal is just what I needed. I never thought of keeping an art journal, but it makes perfect sense.

 For the past three weeks I have carried the journal with me jotting down notes at any given moment my creative light bulb goes on. I use it for my art store shopping list and even just to doodle while I am on the phone or sipping tea while the kids are asleep. It has organized me in an artistic sort of way, but also is a wonderful creative outlet for me. I seemed to have left journaling behind when growing up and I don't know why. It makes me happy.
Emma has asked me for her own art journal like mine and that makes me even more happy. What a great way to show children to be creative, expressive and use their ideas.

The Artterro Art Journal Kit Includes: Spiral-bound (6.5 x 8) journal with solid book board cover to personalize, 14 inspiring project pages, 5 pages of beautiful handmade decorative papers, 6 solid colored papers, artist-quality drawing paper, and pocket folder to store pictures, scraps and found images. All for just under $13.
(I love the pockets, it allows me to save fabric samples and inspiring pictures that I come across.)

I think this journal is a wonderful thing that can be used in so many different ways. I need a entire journal dedicated to decorating ideas for our new home. I would have loved to have one while planning my wedding or babies nursery, but my first art journal is a collection of art I will be doing with my two sweet loves.
To get your your own art journal and more creative kits click here Artterro!

Toddler Art and Fun

It is so interesting to see what keeps a toddler interested and engaged. Grayson likes to feel like he has a job to do and something to figure out. My friend Laura taught me this one when Emma was a little one like this. Now Grayson is a big fan of jars and lids as well. It's that simple.

Could painting get more fun? Yes. With pudding, painting is a toddler dream! Surprisingly he actually painted more than he ate. This was a fun and messy morning, especially after I added some sprinkles to the mix!

Empty milk jug and some small figurines, marbles, beans or anything that can fit into the jug will go a long way. When toys were not cutting it one evening during dinner prep I handed this over to my busy boy. I think something new and different will always grab the attention of a toddler looking for some action.

 We save our empty yogurt cups to use in many different ways. Paint cups, snack cups, to stock the shelves of our pretend market.....but, on this day they were simply to stack.

Saturday, April 21, 2012

Earth Day Recycled Cap Necklace

Happy Earth Day! Join us in making a necklace out of recycled goods that shows our love and commitment to keeping the planet a beautiful place to live.

Material's Needed:

drill (and helpful husband helps too)
blue bottle caps (you could always paint them blue first)
green and red acrylic paint
paint brush or q-tip
yarn in color of your choice, cut to length for necklace


1. Drill your hole. My very sweet husband drilled a hole at the top of each bottle cap for us. 
2. Get started painting the green earth patches. Let dry and if you'd like you can add a red heart in the center to complete your charm.
3. Once dry, thread onto yarn, tie and wear proudly as we celebrate our beautiful planet!

Happy Earth Day!


Wednesday, April 18, 2012

Art Recycle Box


Earth Day is a great time to teach children the responsibility they have to our planet. They are the future and the future starts with us. Let’s get ready to explore some trash to treasure ideas with our kids. I have been talking with Emma and Grayson about ways to recycle and why we recycle. In our house, we have five recycling bins: paper, plastic, glass, compost and art. Yes….art. This is where we recycle anything we think we may use for art in the future.

Start your own ART recycling bin:

  1. Use a box that is an accessible size for children. This box should be kept in a place where children can add and take from very easily.
  2. Decorate the box as a family and talk about different things you could start to save for art projects.
  3. Lead by example. I added the first few items to our box, before I knew it Emma was thinking of all sorts of the things to add. I also pull items out and start creating without directing her in anyway. I just let her watch and eventually she is creating on her own. These are always the best creations in my opinion, no direction, no right, no wrong. Just art from the mind of a child.


Things to save:

Paper rolls, berry baskets, jars, caps, broken crayons, egg cartons, milk jugs, fabric and yarn scraps.
Think outside the box. I promise your child will find an innovative way to use most anything.

Talk to your children about recycling

You want your children to grow into earth-responsible adults who are making a difference in the world. But, you don’t want them to hear the negative effects of not caring for the earth at this point. I think it is a lot to put on a little child’s shoulders, and you don’t want to create a hopeless feeling in these early years. So when you talk about recycling and taking care of our planet, do it in a positive way.  You want your child to see the impact they can create with the small daily things they do each day. You want them to feel like they have the power to keep this world a beautiful place, as they do.

Monday, April 16, 2012

Kid's Garden Giveaway! DuneCraft product review

 Flowers are blooming all around us. Spring is here! My very lovely and innovative friends over at DuneCraft are helping us to celebrate. We had the opportunity to try out their very cute and very fun Mermaid's Growing Grotto kid's plant cubes and you may get to join us with our spring giveaway! Let me tell you about the fun we had learning and planting for spring.

 The plant cubes come with everything you need to start and decorate your ocean themed terrarium. The soil comes dried and compact into a little disc along with seeds, sea shells, gravel, plant stake, beach sand, background and decal. 

 Hydrating the soil was by far the best step for Emma. She added the water slowly to the soil disc and explored and watched as it expanded and filled the bottom of the terrarium. What a great learning opportunity and sensory fun. She got very involved in the planting process.
 
 
The rainbow seeds are teeny tiny little seeds that are just amazing to see sprout.  The instructions said the seeds would sprout in ten days and this was very accurate. On the ninth day, which happened to be Easter morning, we saw our first little sprout. It was an exciting day in our house. 
Once you have sprouts you can decorate the grotto! Another highlight for Emma. 

 
We really enjoyed our Kid's Plant cube and still enjoying it as our rainbow plant is growing more everyday. I love DuneCraft and all of their fun products for so many reasons, but mostly for giving children the opportunity to explore and learn all the while having fun and looking forward to what is next. These are definitely going to become my new go to idea for unique kid's birthday gifts.

Now is your chance to learn with DuneCraft too! In celebration of Earth Day on April 22, 2012 we will be giving away a Pirate's Cove kid's plant cube and Super Snow Jar, which I tried last month and is awesome! 
To submit your entry all you have to do is like Green Owl Art on Facebook and leave a comment here to tell me you did so. On April 22nd at 7pm contest ends and a winner will be chosen using random.org.  Good luck!!
Head over to DuneCraft to shop all their fun products!

Friday, April 13, 2012

Monster Art Exhibit

We started out making clay monsters the other evening and Emma thought it would be fun to create a monster exhibit to surprise Daddy with that evening.  For these guys we used air drying clay, paints, beads, buttons and eyes.

 Next, we made shape monsters. This is a go to art project I use pretty often, especially during dinner time. It only takes markers and paper and very little direction. I simply draw some shapes and give the kids a theme. Tonight was monsters, we have also done animals, homes, people.....

 Last, we made scribble monsters. Same process as above only you draw a big scribble and let them go for it! I think these were my favorite, love where Emma added on arms.

Emma enjoyed walking us all through her art museum that night. I look forward to many more exhibits from her in the future.

Wednesday, April 11, 2012

Playroom Garden

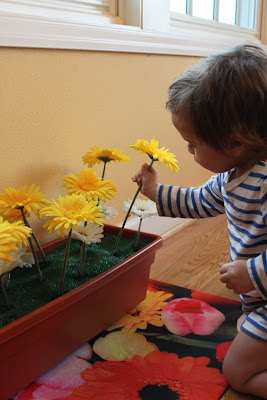
Would you like to keep your kids with planting thoughts all year around? I would. I also loved adding this fun and colorful pretend garden to our playroom to inspire some wonderful creative play. To see my step by step instructions on how to make your own playroom garden head over to Family Sponge where I am sharing this idea today.


Friday, April 6, 2012

The Rustic, Egg Carton Easter Egg

Here it is, the last alternative to plastic eggs that will be joining our Easter egg hunt this year. I did it, no plastic eggs will be attending.  These eggs made out of egg cartons have a great rustic look and are so fun to crack open and find a treat.
                                      
                                       Materials:                                        
egg carton
paints 
paint brushes
scissors
treats
hot glue

                     1. Cut the egg carton domes out, so you will have twelve half egg shapes.


 2. Have the kids decorate them in whichever way they please. We used paints, but you could certainly use markers, glitter glue or whatever their little hearts desire.

 3. Once they are all decorated; wait until the children are asleep and fill them with the goodies of your choice. Close them up with hot glue. Just a few drops here and there will hold it together and allow for them to be pulled apart at the hunt.

Happy egg hunting!

*You could trim these up better and really make them more egg shaped, but I thought they looked great with an imperfect rustic kind of look.

Thursday, April 5, 2012

Crazy Aaron's Thinking Putty - review and GIVEAWAY!

Thanks to my friends over at Crazy Aaron's Putty World we got to try out some thinking putty this week and it is fantastic! First designed to be a desk toy; the putty can be used as a stress ball, hand therapy, squeeze toy or just because it's so fun and addicting to play with. I can not put it down!

Thinking putty is non-toxic, but because little ones like to stick most everything in their little mouths it is safe for age three and up. Emma loves this stuff, really she does. It is our new favorite go to item. Thinking putty has become our in car toy. Great for long drives. It saved us last weekend during a long weekend of house hunting drives and car boredom.

We have been content playing with our putty right out of the tin and enjoyed the hyper color one we got. Emma was thrilled by the changing color. There are so many options and fun ways to use it including science experiments and tricks. Check them all out over at Crazy Aaron's Putty World

I will be buying one to keep in the car, hubby's office desk and a few for the house. I love this product so much that I want to share it with one of you! To enter our putty giveaway all you have to do is:
1. Like Green Owl Art on Facebook.
and
2. Leave a comment here so I can add you to the drawing!

*Contest closes Thursday April 12th at 7pm when a winner will be drawn using random.org.

Wednesday, April 4, 2012

Felt Pocket Easter Eggs

Join me at Family Sponge this morning for another alternative to plastic Easter eggs. These are adorable little felt pocket eggs that I sewed and the kids got to decorate. I have already stuffed them all full of treats and goodies for our Easter egg hunt on Sunday. These will be at every Easter for as long as they last. 

Look at the concentration! Yea, she was into it!

Happy Easter!

Tuesday, April 3, 2012

The Golden Egg

 As we count down to Easter Sunday I am preparing for our big Easter egg hunt. We do this every Easter, but I made a vow to myself this year. I will not use any plastic eggs. Instead I will make things from recycled materials or things that we can use over and over again each year.
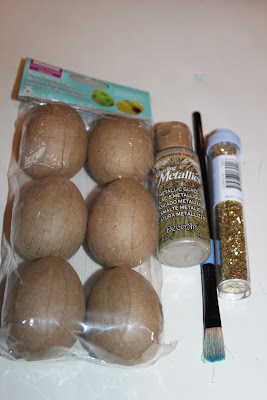
My first, The Golden Egg! For some reason I hear the sound of harps as I say that.

Materials:
paper mache eggs
gold paint
paint brush
glitter

Now all you do is paint your eggs gold and sprinkle with glitter before they dry. At the hunt the children can exchange these eggs for a golden dollar. These look like something anyone would like to hunt for. 
Join me over at Family Sponge tomorrow for another plastic egg alternative that can stay with your family for years to come.

Sunday, April 1, 2012

eco-eggs egg coloring kit- product review

Today we spent the day with family coloring eggs for Easter and thanks to my friends over at eco-kids we got to do it in earth friendly style with their awesome eco-eggs coloring kit! I came across eco-kids when trying to find a way to color eggs this year in a more natural way that is safe for my children and the world around them. These dyes are made of natural and organic fruit, plant and vegetable extracts. How wonderful is that? So, let me tell you about our experience....

 The preparation was really simple. You add the dye powder packets to 1/2 a cup of warm water each and mix. There are instructions for both hard boiled eggs and hollowed out eggs. We did hard boiled today. Now for the fun!

The kit comes with three colors; orange, blue and purple. To achieve other colors there is a chart for mixing. I loved this part and so did the kids. Color mixing is always fun and a great learning tool.

Some of the colors take a bit longer than a chemical dye to really get a deep color, but it's a good opportunity to cut out these adorable egg legs that come with the package. 

Sweet Audrie showing off our cute little egg legs, the frog and duck. You can also print out some other fun egg accessories and watch their step by step video on eco-kids site.

I absolutely love the color of these eggs. They turned out so beautiful and organic looking. I think they would make a great centerpiece on Easter day. Eco-kids has wonderful products that are great alternatives to keeping chemicals out of the home, but still allowing children to explore and enjoy art everyday. To get your own eco-eggs and other great products, check out eco-kids!
Happy egg coloring!