Showing posts with label School Fun. Show all posts

Monday, February 24, 2014

Clay Reminder Bracelets

 Last year when my sweet and very shy Em started kindergarten, I was so nervous. Would she make friends? Would she join groups? Would she speak up? Little did I know that mid-year I would be talking to my shy little one about being too chatty when it was not time for talking.
OK, so I must be honest, being the parent of a very shy child- when I heard of this issue she was having my heart smiled a bit (my apologies for that confession to our absolutely amazing and favorite kinder teacher!) It's just that I worried and worried and worried and ended up having a chatty girl who needed to learn to hush at times. Who would've thought?? Although, all that means to a mother is something new to worry about, right?

 I talked with Emma about this problem and it was indeed true. We continued to talk about why some times it was best to be listening and others times were for talking (and giggling, which is what she does best!) While we talked about this little problem she was having we also worked on making some clay bracelets together. These would be something she could wear at school to be a little reminder of when was the right time to talk.

 We used Sculpey and Fimo oven bake clays. They are pretty tough at first and require some strong kneading to get them more pliable.

 Once they were easy to work with we rolled long snake shapes using several colors. With a plastic bracelet as our size guide we connected the two ends and laid each on a parchment lined baking sheet.
 Into the oven heated at 275 degrees they went for about 15 minutes (until firm and holding shape.)

I painted lips on one to be the special reminder bracelet.

I'm not sure if this bracelet worked well or not, but what it did do is make our conversation about the problem a little more interesting to her and by turning this into an activity it made a lasting impression. She still remembers that talk.

Tuesday, October 15, 2013

Letter Magnets

 It's such an exciting thing when your little one starts to read and write. Watching them go from a wobbly-mama-dependent toddler to an independent kid who reads themselves books--awesome!! OK, can I be honest and also say it makes me sob like a baby that my baby is growing up and practically off to college already!! (Insert sad face)

 All kidding (and mama emotions aside) I love this time in my Emma's life. She writes me letters almost everyday (and yes I keep them all because one day when she does go away to college I plan to read them to myself several times a day) and she reads her baby brother books, talk about sweetness! It's all a new learning curve for me as I try to support and encourage her development, but all the while keep it an enjoyable experience for her.

 Okay, enough rambling and onto the craft. To encourage literacy in the home in a fun way I found some old letter game pieces and along with sticky magnet sheets we made a set of fun letter magnets.

This has been such a great tool for Emma to practice her spelling at home in a fun way. We leave each other notes daily and now even Grayson is starting to use them as he is recognizing his letters.

My Sweet Emma, 
You are growing up so very fast and making me so proud every step of the way.
Love, 
your mama

My full Letter Magnet tutorial is over at Kiwi Crate.

Tuesday, September 3, 2013

The "With Me All Day" Pendant

 Summer is officially over for us. Tomorrow is the first day back to school. While the excitement is running high, I noticed today there is a bit of nervous bugs biting, as well. I didn't want to stomp on the happy parade and talk way too much, so instead I asked Em to make me a necklace to wear while she was at school. I told her I might be a little sad after spending all summer together (complete truth!) and that a little reminder of her would help me. Before she even got started with mine she asked if I would make her one, too. Of course I will, my sweet girl, of course.

This is the one she made for me. I love it. We used oven dry clay and our hands! Before we popped them into the oven we added a small hole using a toothpick. They baked at 275 degrees for about 15 minutes. When cooled we just threaded onto a piece of twine and had our sweet pendants ready for tomorrow.
I think this will definitely help me get through those first few days.

Wednesday, August 28, 2013

Morning Chart

 Last year, I learned all too well how hectic school mornings can be. When my dear friend, Gwen, showed me the brilliant morning chart she had made I knew I had to get on board with this simple way to ease morning chaos!

 All you need for this is a large piece of foam board or even poster board and markers. I sat down with the kids and talked about how our mornings should go and what needed to get done. We drew pictures together and added little arrows to make it easy to understand (even for my then two-year old.)

We placed our Morning Chart in an easy spot to see, somewhere that we start our mornings out at. This is a great guidance for my children and allowed them to do things independently and with less reminders from me. 
Wishing you all peaceful school mornings!

Monday, August 26, 2013

Back to School Comfort

 With just over a week away from starting a new grade my sweet girl is starting to feel very excited and a bit nervous all in one! To calm her nerves and keep the excitement coming we did a few activities to get ready.

 Have you used Shrinky Dink sheets yet? They are great. We use them for so many crafts, but on this day we made a comfort charm to wear to school. I cut a heart from the shrink sheets and punched a hole in the center. Em drew a picture of her family to have close to her on those first few days when she is missing us.

 Here is the charm before the shrinking. Into the oven it goes at 300 degrees just for a few minutes. The charm will curl up and flatten out and that is when it is done.

 Here it is right out of the oven. The kids just think this is the best thing ever!

With a piece of twine it is the best first day of school accessory ever! She made me one, too. In case I miss her while she is gone. Go ahead, melt my heart.

 This is our "All About Me Card." When talking about having a new teacher and maybe even some new friends Emma was feeling a bit nervous. We chatted about all the things she wanted her new class to know about her. I told her how each and every one of these things made her special and unique and made her...Emma.

At first we made this to bring to her new teacher as a friendly introduction, but what Emma gained from just doing this exercise was much more than I planned. She was confident and proud to be Emma and excited to make new friends, see old friends and enjoy another wonderful year of school.

Saturday, August 24, 2013

Tie-Dye Napkins for School Lunches

 Tie-dye is one of our favorite crafts to do together. The excitement of not knowing how it will turn out is the best! With school just a couple weeks away we made something new using tie-dye--cloth napkins! This were a hit with Emma. She is so excited to take them in her school lunch.

 If you get a simple clothing dye kit at the craft store it will come with everything you need--gloves (a must!) squirt bottles (pre-filled with dye,) and rubber-bands. All you need is the plain cloth napkins and you're ready to get dyeing.

 We dampened our napkins and pulling and twisting straight from the center began adding the rubber-bands. The more bands you add the more contrast you get.

 When we were all set we laid them in the grass. Tie-dyeing outside is a must! That dye does not come out!

 Emma got to work adding color. alternating the color in between each band works best. Once the napkin twists are fully saturated with dye, place them into a plastic bag and let sit for at least 24 hours. The next day cut the bands off and toss into the washing machine. After I wash these I usually turn the washing machine on a cycle to rinse out any remaining dye before I do a load of laundry.

They came out pretty cool! Emma is thrilled to have her own special set of cloth napkins for her school lunches.

Monday, August 19, 2013

Napkin Notes for School Lunches

 Back to school is just around the corner for us and while Emma is very excited to enter the 1st grade she is also feeling a bit nervous. As much as I wish I could take all those scary feelings away and leave her with all the good ones, I can't. But, what I can do is comfort her as much as possible. I do this by talking and talking and talking some more. The more we talk about it the more she opens up about how she is feeling and the more she gets excited about all the exciting things to come.

 We sat down and decorated a few plain cloth napkins using just fabric markers. It was a fun activity to get Emma excited for school. It also was a great way for me to make comforting notes and silly drawings to send with her to school.

Fabric markers are a great tool to also label school supplies like backpacks, lunch bags and jackets. I shared this idea and many more over at Kiwi Crate.

Tuesday, August 6, 2013

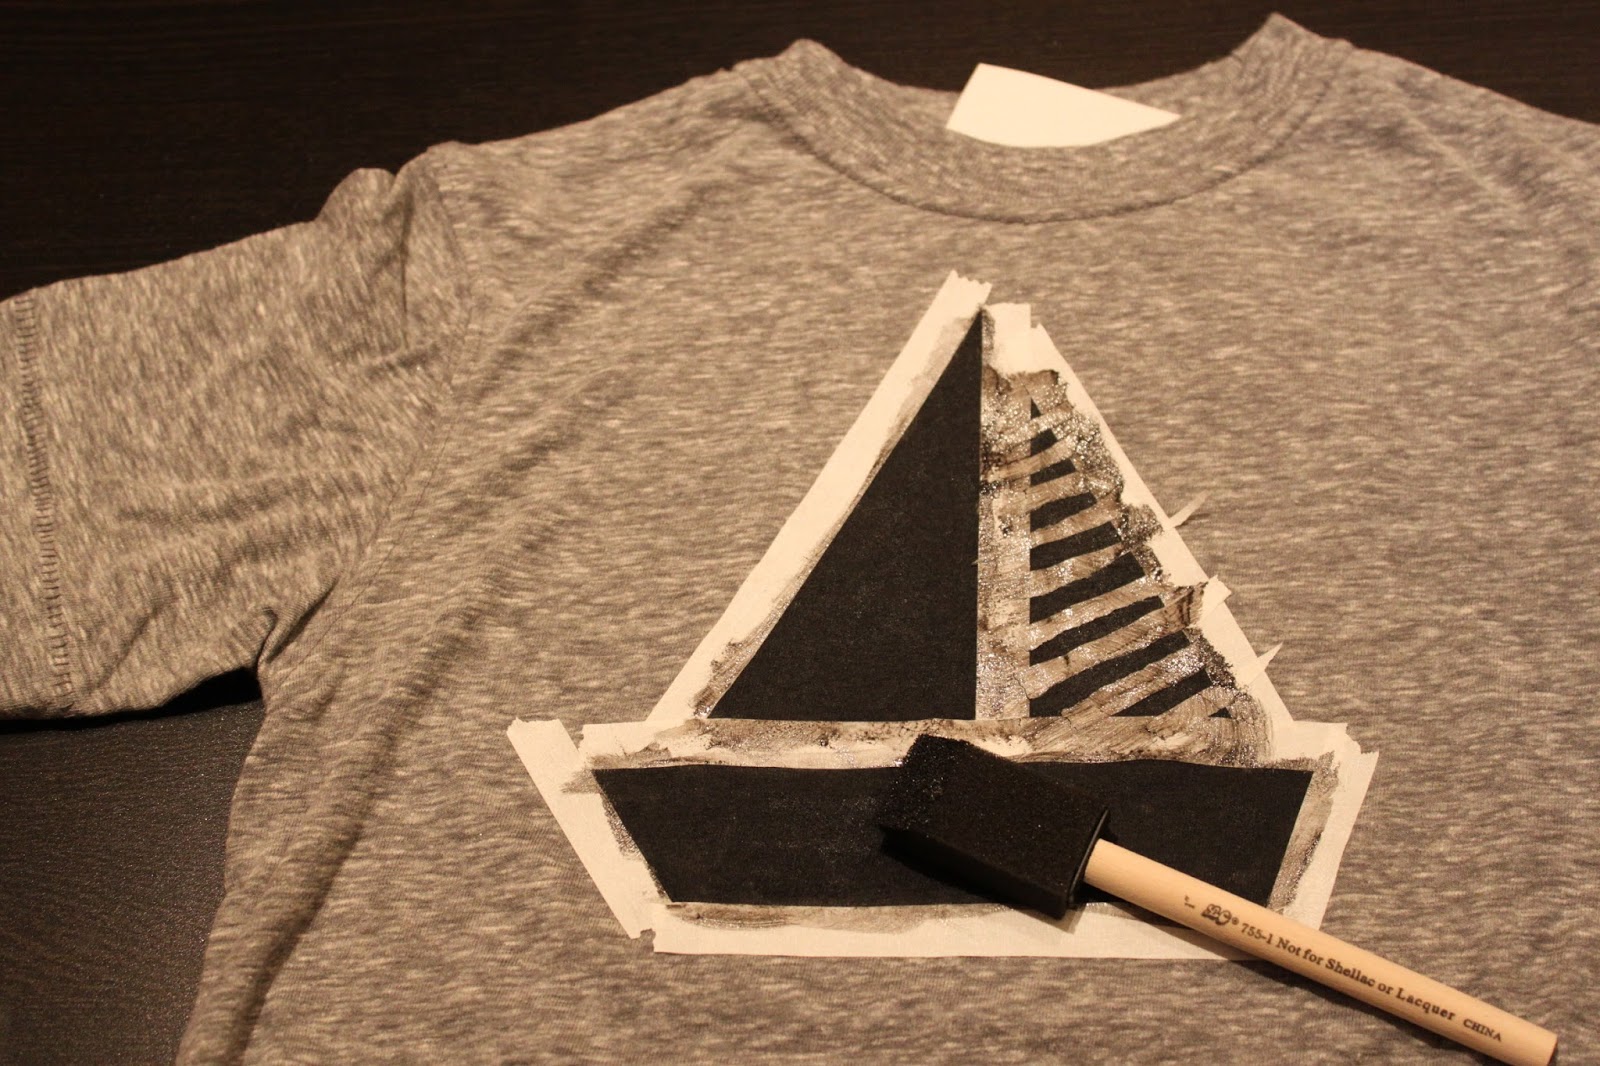
DIY Graphic Tee for Back to School

 Well, we have started the count down (boohoo!) Summer vacation is almost over and we are starting to prepare for another wonderful school year. This is such an easy way to make a very cool t-shirt for back to school and also a good way to kick off the conversations about all things to come.

 Materials 
  • t-shirt (pre-washed)
  • masking tape
  • fabric paint
  • sponge brush
  • sheet of paper

 1. Make your image outline using masking tape right onto the shirt. (Things with straight lines work best with this technique. Think simple!)
2. Add a sheet of paper or cardboard in between the shirt layers to keep the paint from going through to the other side.

 3. Squeeze small amounts of fabric paint onto the shirt and use the sponge brush to fill in your image. You want a very thin layer of paint.

 4. Once you are done filling in the image you can pull the tape off and let dry for a few hours.

There you have it! This was so easy and fun to customize for my daughter. I think I may have a new crafty addiction!

Thursday, January 17, 2013

Kid's Lunch Surprise!

 Got an abundant amount of leftover holiday cards, like me? Make your child's day by getting silly with some markers! Emma loves when I leave little notes and drawings in her lunch. I am sure it is a fun and comforting surprise to find while at school.
 I only wish I could see her face and hear her giggles when she finds this one today!
And into the very cute Mimi the Sardine (I heart them) lunch bag.

Sunday, December 16, 2012

Holiday Gift for Teachers

 Isn't it a strange thing the first time you send your wee little one into the arms of another to be cared for, taught, nurtured and loved? I feel so blessed to have already (in our short school age days) had some amazing teachers in Emma's life. I always like to make sure our teachers know just how much we appreciate them.
Here are a couple extra special touches we added to the teacher holiday gift this year. The card above involved each child in the class. Over a couple weeks I some how got each child to answer this question "What gift do you hope Ms. Amanda gets for the holidays?" I wrote their gift wish for their teacher and they signed their names on round card stock pieces that I cut out with a paper punch. With a few extra touches a very special card came together and the kids sweet answers to this question were funny, touching, sweet and very thoughtful. It's always great to hear what five-year old's have to say.
 This frame was easily made with some chalkboard paint and allowed me to personalize a class photo for our amazing teacher.
Just throwing in a simple way to say Happy Holidays to the children's friends. Homemade play dough packaged nicely is always warmly welcomed in my house (especially over sugary treats!)

I hope you find wonderful ways to thank the people in our lives that take on the job of being there for our children in so many ways. I know for me I can never actually show how I appreciate these great people that make lasting impressions on my children.

Saturday, September 8, 2012

Sunflower Pen for a new friend

 We had a very special day last week. We met Emma's kindergarten teacher. I couldn't believe it, as I walked through the halls of an elementary school. Really? This day is here? My baby that I feel like just yesterday I was rocking back and fourth in the rocking chair knowing she was asleep, but continuing to rock because I just wanted her to sleep on my shoulder a bit longer. That baby, that baby is going to kindergarten this Monday? Really? I know it had to happen and I know it will be a fun and exciting time for her, but I will cry. There you have it. I will not say maybe or might. I just know, I will cry, but that is why I spent that extra time rocking because you see...it's all going by so fast. 
 Now on to the craft! We thought a nice gesture for our new teacher would be our favorite happy sunflower.
 Using floral tape we added some forever (artificial) sunflowers to pencils. It was simple and cheery and a great way to start a new year with a new friend.
Here we go!


Friday, May 4, 2012

Teacher Appreciation Gift - pencil cup

Next week, May 7th to May 11th is Teacher Appreciation week. I can't think of of too many people I appreciate more than the people I trust with my children. To teach them, guide them and even love them. For this I am grateful for having had some amazing people teach my children and we are not even in elementary school yet.

To show our appreciation on this special week we have made pencil cups for our teachers and we think you should for yours too!

What you need for your pencil cup: 

an empty and clean food can (be sure your can opener doesn't leave any sharp edges)
scrapbook paper
double sided tape

1. Cut your scrapbook paper into a strip just a little bit wider than your can and long enough to wrap all the way around.
2. Use your tape to wrap around the can and trim the bottom edge once it is in place.
3. Fill with pencils, pens or anything you think your teachers will enjoy and probably go through often. We attached a little notepad to the back with some twine.

To all the teachers out there, thank you.
Sincerely,
green owl mama

P.S. I have used this technique to hold flowers on tables at a party and to bring flowers from my garden to a hostess. They are great to keep on hand.

Sunday, March 11, 2012

Flash Cards

    
I really can not even comprehend that we are months away from starting kindergarten. Where has the time gone? I remember Emma's first steps like it was yesterday. That feels so cliche to say, reminds me of every older woman that I run into at the grocery store that tells me to cherish each moment because time goes way too fast. Well, I am starting to feel that fast clock move and it is scary. If only someone would have figured out that freezing time thing by now.

In preparation for kindergarten we made some fun flash cards to practice math with. I found this cute box of note cards and wrote numbers on them with a black sharpie. Emma found and counted out all the trinkets (coins, buttons, stickers, googly eyes) and we glued them on our note cards. This is a great visual learning tool and best of all Emma enjoys playing with them. 

Now I am off to cherish these moments, they go by fast, you know?
Happy Sunday!
xo
green owl mama

Thursday, February 2, 2012

Sculpey Eraser clay


I stumbled upon this very cool product a few weeks ago while in Micheal's and finally got to try it out with Emma and my sweet nieces, Olivia and Abby. Sculpey Eraser Clay, here is a link to their site with some fun ideas for eraser making http://www.sculpey.com/products/clays/sculpey-amazing-eraser-clay It was a great project for all three girls ages 2, 4 and 7. It comes with everything you need to sculpt your creations and afterwards you bake for 20 minutes and are all set to erase. Olivia thought they could erase a little better, but they get the job done.
I think this is definitely something we will do again. If you try it, let me know what you think.