Showing posts with label dress up. Show all posts

Tuesday, June 30, 2015

Red, White and Blue Tie-Dye for The 4th of July

 That's my cutie patootie nephew above, eating ice cream in his red, white and blue tie-dye. Is that photo just screaming the 4th of July or what?! Yes, tie-dye is a necessity for the 4th and really easy to do!

 You need a t-shirt, (did I just state the obvious? Sorry!) plastic gloves, rubber bands, plastic bag and red and blue dye. If your dye does not come with those great squirt bottles then you will need those, too.

 With a damp t-shirt you will pull up from the center and start to twist. This is for traditional style tie-dye. You can also just twist in random spots to create small star-bursts all over the shirt.

 Start to rubber band the shirt as you go.The more bands the more design you get. I usually use about 8-10 per shirt.

 OK, this is a must do outside part of the project. Once your shirts are all twisted and secured with rubber bands you can start dyeing. Squirt the dye right onto the shirt using enough to saturate the shirt. Try to keep the colors separate. They will blend quite a bit if they touch too much. Once they are covered well with dye place the shirt into a plastic bag over night. The next day cut the bands off and wash (alone) in the washing machine.

 And now you got yourself some pretty cute 4th of July gear! For more details I shared this tutorial over at Kiwi Crate.

Happy 4th!!!
With Love,
Em, Gracie, Neh-Neh and Jewels

Saturday, March 28, 2015

Easter Bonnet

 Sometimes you may notice in photos of Emma, large flashy rings, several strings of beads around her neck, sticker "earrings" on her ears and clothes that only a five-year old with an early opinion for fashion would choose. Yes, she already has an eye for the runway. Often, we are told "you are going to be in trouble in a few years!" But, I love her creative eye and her love for style already at five years old. I'm sorry, I just find it adorable! I'll get back to you in ten years!
 On to our sweet Easter bonnet (styled by Emma.) Can you believe this hat started as a paper bag? Yep, we just rolled it down until we had a hat. This technique could work for so many different hats. I think I may make Grayson a pirate hat soon. He would love that. Yes, while Emma loves fashion, Grayson is more of a pirate loving kid and yes I am embracing that one too and hoping that in ten years there is no need for further addressing of the issue. Hehe...imagine that!
 With some paint our paper bag started to turn into a hat. Emma mixed a few colors to get this perfect shade of lavender. Pretty, right?
 A few details and some hot glue and we were set. I am working with Emma on learning to use the hot glue gun. This makes her smile from ear to ear. Any kind of grown-up step and she is in absolute heaven.
There you have it! Our homemade Easter Bonnet. For more details on this project check out my full tutorial on Kiwi Crate!

Monday, February 24, 2014

Clay Reminder Bracelets

 Last year when my sweet and very shy Em started kindergarten, I was so nervous. Would she make friends? Would she join groups? Would she speak up? Little did I know that mid-year I would be talking to my shy little one about being too chatty when it was not time for talking.
OK, so I must be honest, being the parent of a very shy child- when I heard of this issue she was having my heart smiled a bit (my apologies for that confession to our absolutely amazing and favorite kinder teacher!) It's just that I worried and worried and worried and ended up having a chatty girl who needed to learn to hush at times. Who would've thought?? Although, all that means to a mother is something new to worry about, right?

 I talked with Emma about this problem and it was indeed true. We continued to talk about why some times it was best to be listening and others times were for talking (and giggling, which is what she does best!) While we talked about this little problem she was having we also worked on making some clay bracelets together. These would be something she could wear at school to be a little reminder of when was the right time to talk.

 We used Sculpey and Fimo oven bake clays. They are pretty tough at first and require some strong kneading to get them more pliable.

 Once they were easy to work with we rolled long snake shapes using several colors. With a plastic bracelet as our size guide we connected the two ends and laid each on a parchment lined baking sheet.
 Into the oven heated at 275 degrees they went for about 15 minutes (until firm and holding shape.)

I painted lips on one to be the special reminder bracelet.

I'm not sure if this bracelet worked well or not, but what it did do is make our conversation about the problem a little more interesting to her and by turning this into an activity it made a lasting impression. She still remembers that talk.

Monday, December 30, 2013

New Year's Eve Party Masks

 I love DIY party accessories. It's great to see what each child creates. For New Year's Eve you can't go wrong with some fun masks.

 I grabbed these basic eye mask cut-outs for our New Year's Eve party (you could also cut a simple eyes mask from card stock or a paper plate) and I will provide the kids with dot paints, glue sticks, sequins, feathers and confetti to decorate. They can add a simple craft stick to the back with masking tape to hold over their eyes.

 There is so much that can be done with these. It would be fun to challenge the grown-ups as well!

 This one is just dot paints with confetti on top. So colorful!

 You could use the craft stick or even an elastic band.

I might have to pull these back out for Mardi Gras.

Happy New Year! See you in 2014!!

Sunday, December 15, 2013

DIY Bubble Necklace

 Today Em has woke up early and headed into our art room for some major gift crafting time. She has a long list of ideas and has that creative look in her eyes that makes a mama proud! I think we might just stay in the art room all day long.

 Since we are in homemade gift mode at the moment I thought I would share this favorite of ours that is perfect for a friend, cousin or anyone that loves to get fancy! Best of all you don't need much to make this great gift--a few large wooden beads, twine, acrylic paint (we like shimmery colors,) a paint brush and a paper cup.

 The paper cup is helpful to paint the wooden beads all at once without them rolling all over the place.

 Once they are covered pretty well we laid them on a piece of cardboard to dry and touched up a few spots with paint.
A little twine brought our very cool bubble necklace to life! I think that's pretty good for a DIY gift, don't you?
We have made a few of these now and it is a lot of fun to experiment with new paint colors. A favorite of mine was the black and white (aka zebra necklace) that Em made for a friend. We also tried some florescent colors that were a big hit!
Happy gift crafting!

I shared this and many more homemade gift ideas over at Kiwi Crate

Sunday, October 13, 2013

8 Easy Costume Accessories

 Here are 8 simple ways to create a costume at home with things you most likely already have around the house. Best part is children can be involved in making their costumes! Have to love that!

 I love the delicate vintage look of this lace crown. When we first made it I imagined it being perfect for a newborn photo shoot. There are so many options for this one to become the perfect crown for any princess desired costume.

 To make a lace crown all you need is glue, lace, a stapler and optional gems. Emma painted a strip of lace with glue and let it dry. Once dry she stapled it together to form a crown and added gems to the top. There are so many options when it comes to lace ribbon. You can make this as extravagant as you like. Check out my full tutorial at Kiwi Crate for more details.

 The royal pipe cleaner crown is so easy for kids to make and can be embellished with beads or left simple. This is a fun costume accessory for Halloween, a birthday or any ordinary day.

 Just twist and sculpt the crown the way you like. Check out my full details at Kiwi Crate.

 We made this bonnet for Easter last spring, but we have continued to use this technique for many different hats. It can easily become a pirate or witch hat with a little black paint and felt details. Check out details here, Easter Bonnet.

 Do you have a Rapunzel on your hands? Or maybe a clown or Raggedy Anne? This is another accessory that is very versatile and yarn hair is much sweeter than those plastic hair wigs you find in the stores. To see full instructions head to my DIY Crazy Hair Wig post.

 These unicorn headbands were originally made for Emma's Unicorn birthday party, but have become a favorite in our dress-up box. Add a tutu and tail and you got a great unicorn halloween costume. See more details here, Unicorn Birthday Party.

 Wands are good for many costumes. These were specific to fairies, but can easily be changed to any sort of wand you need. They start out with a stick found in the yard, pretty easy to do. My full instructions are at my Nature Fairy Wand post.

Have a rock star in your life? Well, you will definitely need a microphone! A paper roll and balloon make this rock star ready to perform. Details are over on my DIY Music post.

 Another wand completes this list. This has been used for the princess, fairy and magician in my house.
We made this with a styro ball, chopstick and some ribbon. Details on Kiwi Crate.

What are you creating this Halloween? So far I have had requests for a princess leopard, spider-man, super hero pirate and a mermaid. I wonder what the final call will be.
Happy costume crafting, friends!

Tuesday, August 6, 2013

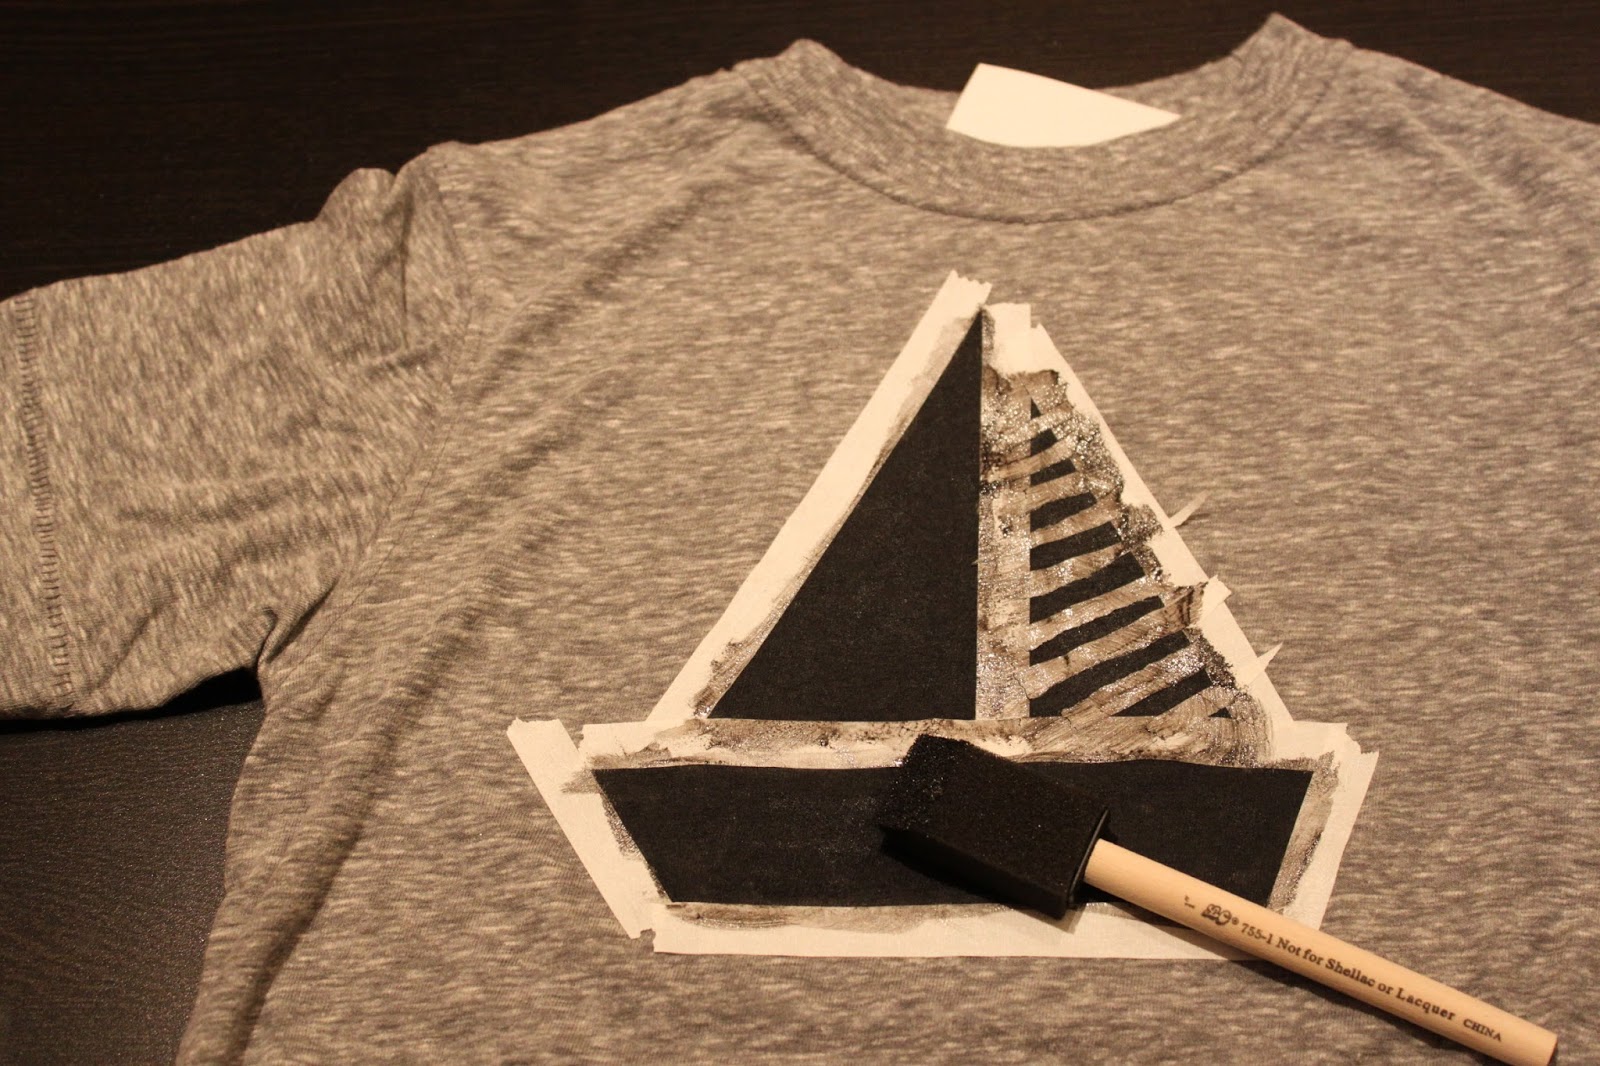
DIY Graphic Tee for Back to School

 Well, we have started the count down (boohoo!) Summer vacation is almost over and we are starting to prepare for another wonderful school year. This is such an easy way to make a very cool t-shirt for back to school and also a good way to kick off the conversations about all things to come.

 Materials 
  • t-shirt (pre-washed)
  • masking tape
  • fabric paint
  • sponge brush
  • sheet of paper

 1. Make your image outline using masking tape right onto the shirt. (Things with straight lines work best with this technique. Think simple!)
2. Add a sheet of paper or cardboard in between the shirt layers to keep the paint from going through to the other side.

 3. Squeeze small amounts of fabric paint onto the shirt and use the sponge brush to fill in your image. You want a very thin layer of paint.

 4. Once you are done filling in the image you can pull the tape off and let dry for a few hours.

There you have it! This was so easy and fun to customize for my daughter. I think I may have a new crafty addiction!

Monday, July 8, 2013

Bread Tag Charms

Emma is a charm collector and I completely get it! I can remember having a pretty large charm collection of my own at her age. We decided to make a few special charms together and I must say I may have enjoyed making these more than her!
 First step was to collect A LOT of bread tags, which happened faster than I expected. I guess we eat way too much bread.
 We used acrylic paints to decorate our charms. This is a great craft to do together. It was fun to brainstorm charm ideas together.
 After spending all morning painting we set our charms out to dry. They dry pretty quick.
 Emma chose rainbow chord to become our charm holder. Perfect!
 All that was left was to add them to the necklace.
 She loved wearing these out and explaining to friends what each charm meant to her.

For more details I shared this tutorial over at Kiwi Crate.