Showing posts with label Messy Art. Show all posts

Friday, February 13, 2015

Kool-Aid Paint

 My kids think kool-aid is an art supply and that is all. I think it's pretty fantastic, but I am sure someone will burst my bubble soon and fill them in on the joys of drinking pure sugar, but in the meantime we continue to make kool-aid play dough and kool-aid paint with our very common "art supply."

 This is so easy to set-up. All you need is those little colorful packets and water. I usually use an entire packet to about 1/4 cup of water or so. Warm water helps dissolve the kool-aid a little faster.

 That green one was actually a frosting add-in (yum!)

 Em loves to help make these paints and she loves that her paintings smell so good! When we were using these paints the other day we thought this would make the perfect yummy smelling Valentines for friends. I'm thinking red kool-aid painted hearts on card stock. What do you think? It's almost a treat!

 Happy Valentine crafting!

I shared this over at Kiwi Crate. Head over for more Valentine's Day fun!


Wednesday, February 4, 2015

Celery Rose Prints

 When I was brainstorming for something to use to make prints with for Valentine's Day, celery was an obvious choice. If you do not know yet, (now you do!) celery makes the most beautiful rose prints.

 You just use the bottom part of a celery bunch, the part you would toss into the compost, so no wasted food here. We have always made red roses, but decided to get a little crazy and throw in some purple to the mix on this day. I know, I know....we are a bit of a dare devil type family. Never know what's going to happen in this house (look out, pink snowman coming your way!) Tehe...it's early...I need coffee.

  We paired our prints with oil pastels and they came out so vibrant and fun. If you have not tried oil pastels with the kids yet, I highly suggest you give it a go, but of course crayons would work just fine, too.

Now that I am looking at these photos I think going over this with watercolors would be fantastic! I wonder what other produce would give you a floral print. I see a spring bouquet print in my future!

Wednesday, February 26, 2014

3-Year-Old Art and My Boy

It has been on my mind to write about the art I do with this adorable little guy. I don't write about it very often because it's usually very rushed and very simple, but then what art with a 3-year-old is not, right?
Recently, we had a little health scare with G. He had some extensive testing done for leg numbness and pain he had been having and in the end (of what seemed to be the longest road of my life) we found out it was all caused from a gluten allergy. Crazy, right? At one point MS and MD were brought up and you can imagine my fear. Who would have guessed that the pb&J that this guy so loved, was the culprit?! Anyway, my reason for telling this is mostly because I think of my blog as a journal for my children to have one day and also because writing about these things helps me so very much, so thank you for listening.
Sometimes, we take for granted simple things in life like kids that can run too fast or scream too loud; boys that like to wrestle and jump all day long and just being able to watch our healthy children grow up. I realized this when I was being referred to a doctor for a muscle biopsy on my three-year-old son to tell me whether or not he would continue to be that kid that always runs too fast and jumps too hard. 
Thankfully we were able to fix G's problem with simple diet changes, but some people are not so lucky. So, I try and remember this every time my kids are running circles through my kitchen and racing up the stairs. We are lucky, so very lucky.
OK, OK...onto the art!

Rolling Pin Stamp 
This is one of his favorites. We add foam stickers to a rolling pin and roll it through paint to make prints. I think he appreciates being able to use the rolling pin! Check out full details at Kiwi Crate.

Lego Stamps 
Stamping with legos or really anything other than stamps is a favorite for my little guy!  He's an inventor and who needs actual stamps anyway, right? Lego Stamping

Foam Sheet Bath Art 
Yep, those are just foam sheets cut up into shapes and thrown into the bath. Success! He loves it.  Foam Sheet Bath Art

Milk Carton Animals 
Anything that you can turn into an animal wins for this boy! This milk carton turned pig has been a highlight in his life (seriously!)  Milk Carton Animals

Color Match Caterpillar 
This is a fun matching game that is simple to put together and loads of fun for the little ones to play. Color Match Caterpillar

Spaghetti Fun 
Lastly, he may not be able to eat it, but he sure can play with it! G is big on sensory fun and it is probably the activity that keeps him busy the longest. Colored Spaghetti Fun

These are some of the things G and I love to do while hanging out and creating some art. He is a busy busy boy and I wouldn't have it any other way because when you are faced with that changing you realize how lucky you are.

My Sweet G, 
I love you more than you could ever imagine.
xoxo


Tuesday, February 18, 2014

Collage Art with Kids

 My favorite art to create myself is definitely mixed media collage art. I love using all the different mediums together to make one unique piece of work. I love the way the colors and textures blend together and I especially love how very forgiving collage art can be.
Emma has been enjoying this way of creating more and more lately. I thought it would be a fun one to bring into her class, but with limited time I had to come up with a way to simplify this process.
 By creating one drawing four times I was able to draw out each step we took to make this cute hippo. I think this will be a great visual for the kids to see and understand how he was created.

Materials:
watercolor paper (4 sheets)
graphite or other drawing pencil
watercolor paints
assortment of decorated paper
mod podge
colored pencils
acrylic paints
paint brush
 
1. First draw out a simple drawing on the first sheet of paper. Then, do it three more times. Choose something simple and easy to look at. Set one aside as is.

 2. On the second drawing you will take it one step further and paint with watercolors. Set this aside.

 3. On the third sheet you will complete both step one and two and also add scraps of pretty paper with the mod podge. Use the pencil to outline major lines of your drawing that have faded away with the paint.

4. On the last sheet you will do all three steps that we have already done along with adding some more fine details with arcylic paints and colored pencils.

Here are all four drawings together. I think this is such a great way to teach collage art in a short period of time and with a large group of kids. It shows them exactly how the art is changed with each medium being added. Once they have an understanding of the process the possibilities are endless. You can start using random items like foil, paper punches, tissue...ect. It is a fun way for children to explore and create without the pressure of creating something that fits into specific guidelines.

Thursday, January 23, 2014

Marble Paintings

 Marble painting is one of our favorite painting techniques, probably because you can make art and get silly all at the same time! Bonus--the paint is all contained in one box!

 Supplies:
card stock or any heavy paper
marbles
paint
a box (about double the size of your paper

 1. Place your paper in the box (side flaps removed) and add a few drops of paint on the side of the paper.
 2. Drop the marbles into the paint.

 3. Now have the kids roll the marbles back and fourth around the box. This is the silly part that the kids love.

 4. Once the paper looks nice and colorful, remove, let dry and start over!

 These prints come out really fun and the kids love to make them. I was thinking we could just cut hearts out of our art for some really fun Valentines. You could also start with heart cut-outs that you place in the box.
I am going to be doing this at our school craft day this year. I think it will be a hit with several age groups. I was thinking of using newspaper hearts (wouldn't that be pretty cool?!)

I shared this over at Kiwi Crate.Check it out!


Monday, December 16, 2013

3-D Snowman Art

 Hello Friends! I am trying to share a few more fun holidays crafts with you before I close shop for holiday break with my family. I won't be writing new posts until New Years, but I will be sharing fun holiday ideas on my Facebook page. Thanks for the continued support.
This snowman craft was one I just had to get out for all you before I signed off. My kids (and I!) just loved this one. Have you used shaving cream for art like this? It is very cool and becomes art and sensory fun all in one!

To make your shaving cream paint all you need to do is mix equal parts of shaving cream and school glue together. It becomes the consistency of marshmallow fluff. It would be fun to add glitter at this point if you wanted some sparkle to your paint and who doesn't love sparkle?!

 Now, paint away! We made snowmen on this day. You could use this for many fun project ideas. I have seen adorable polar bears made this way as well. So cute!

I had an assortment of beads, button, pipe cleaners and pom-poms for the kids to build their snowmen with. G added a belly button on his!
We let these dry for a few hours. They feel like marshmallows when they are all dry and they stay nice and fluffy. Pretty cool!

 Oh yes, we just had to make a melted snowman!


Happy Holidays to you all! I wish you peace, love and many many cherished memories made.
xo
green owl mama

Friday, December 6, 2013

Watercolor and Salt Winter Scene

 Our first snow arrived today. Nothing like it. We were in a happy winter mood and decided it was the perfect afternoon for some winter scene paintings.
 I am a big fan of watercolors for my children and myself. There are so many different ways to use and adapt them to every age. There is not much I would rather be doing then sitting with my kids and creating a watercolor painting together. It just makes me happy!

 For this winter scene project we used a pan set, but we are big fans of liquid watercolors as well. They are easy for little ones to use and you can also use it for things like shaving cream prints and to color play dough! Talk about versatile.

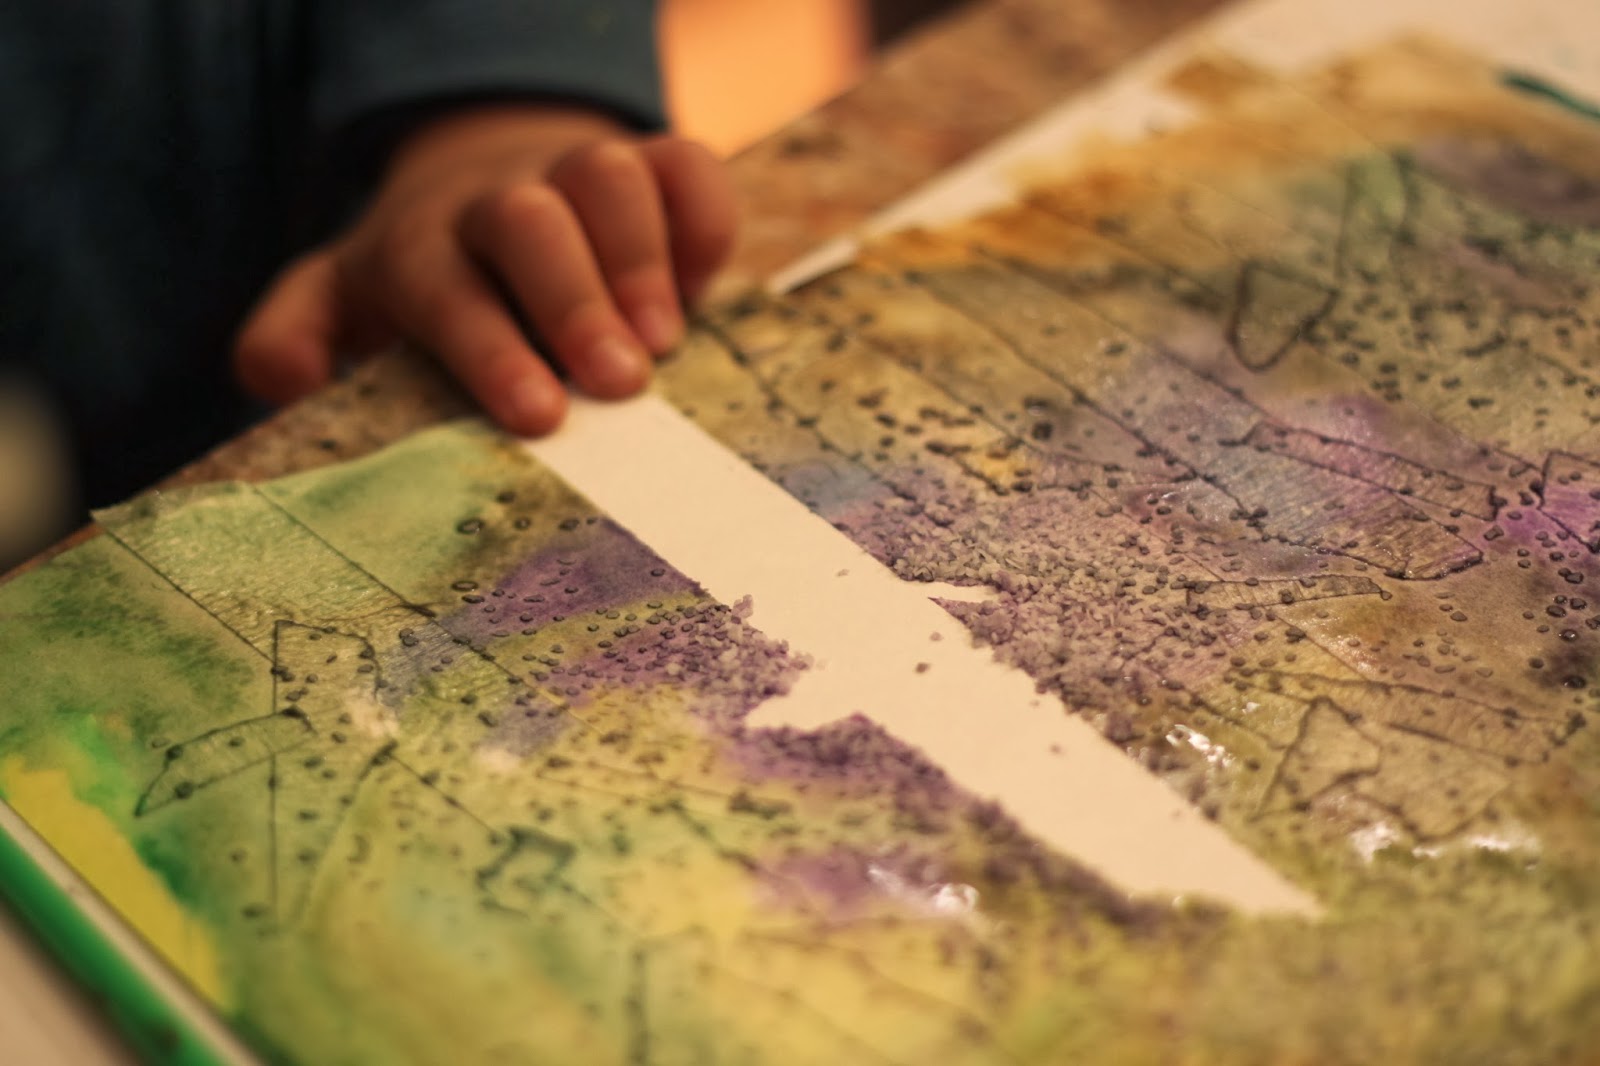
 To start our project I had the kids create some bare winter birch trees with masking tape on a sheet of watercolor paper (yes, this paper makes a big difference when working with watercolors.)
This project has been done in so many different ways and I wish I could find my first inspiration for it, but we've been painting these for several years now and it never gets old.

 Once the masking tape trees were in place the kids started to paint the background winter sky. I asked them to use only three colors for this project and focus on blending the colors.

 We compromised and they used about five colors. They painted right on top of the tape (so be sure the tape is sealed to the paper well.)

 While the painting was still wet we sprinkled a little bit of sea salt on top. This is to create a snowy look. The salt absorbs the watercolor and looks like snowflakes falling. It's instantly beautiful.

 G got a little carried away with the salt. I was just happy how engaged he was in this. I usually lose the little one after step two.

 Finally the tape comes off to reveal our beautiful birch trees. I think I forgot to mention to encourage tearing of the tape to create rough edges. It makes a big difference.

Using a dry brush we added lines to the trees and let our painting dry. Once dry most of the salt falls off and leaves behind our wonderful snowflakes.
What a great way to spend our first snow day. Happy winter, friends!

Friday, October 18, 2013

Halloween Sensory Play--Pumpkin Treasure Hunt

 When the kids saw me pull out the small sugar pumpkins (that I had planned on roasting to make some pumpkin curry soup) they squealed with delight. Not because of the pumpkin curry soup (go figure,) but because they thought it was time to make jack-o-lanterns. I didn't want to crush their happy little pumpkin moods, so I had to think fast.

 I grabbed some little Halloween treasures that I had from a few years ago when we made a Halloween sensory bin and I gave them a good washing.

 Next, I cut the top of the pumpkin off and added all of my treasures to the inside of the pumpkin. You have to use your hands to get them good and covered with pumpkin mush. Once they were all hidden I called the kids over for a pumpkin treasure hunt!

 They weren't exactly sure what their crazy mom was talking about, but quickly caught on as they pulled out the first orange gem.

 We had a bowl for seeds and a bowl for treasures. Grayson really enjoyed separating the seeds from the treasures.


 He didn't want to believe the treasures were all gone, so he continued to look. I think he might have climbed in if he could.

We love sensory play and this was a fun way to make it festive. Now what will I do for Thanksgiving? Definitely not a turkey treasure hunt. Definitely not.

We made pumpkin seeds with coconut oil and sea salt (so yummy) and I got my pumpkin curry soup after all.